Fixed price · from €1,599 all-in

Standard EV Charger Installation in Ireland

Most Irish homes qualify for our fixed-price Standard Installation. We confirm it from the photos you upload — a set of clear checks across your fuseboard, meter, earthing/bonding evidence, parking and cable route. If anything needs an electrician to review first, we'll tell you upfront.

Looking for the full installation service overview? See EV charger installation Ireland.

What is a Standard Installation?

A Standard Installation is a home EV charger job we can complete within an agreed scope at a fixed all-in price following assessment — €1,599 with the standard BENY charger (upgrade chargers have their own fixed price) — charger, installation, certification, and SEAI grant paperwork included.

It applies to houses with off-street parking where the existing setup is clear from your photos and meets ESB Networks, SEAI, and Safe Electric requirements. Most Irish homes qualify.

You receive €300 back from SEAI after installation, bringing your net cost to €1,299. We handle the entire grant application for you.

Curious what charger you're actually getting? See the BENY 7.4 kW smart charger we install in every Standard Installation. If your existing consumer unit looks older, read when a fuse board upgrade is needed.

Registered hardware. Proper installation. Clear support.

Every charger in our range is SEAI-registered and quoted at one all-in price, with dynamic load balancing fitted as standard.

  • Grant-eligible hardware

    every charger we offer is on the SEAI register, so the flat grant applies whichever you pick.

  • Installed as a package

    charger, protection, commissioning and certification stay together.

  • Load balancing included

    dynamic load balancing and its current sensors come fitted, not sold as an upsell.

SEAISmart Charger RegisterSafe Electricregistered installerCEEU conformityWarrantyunit + workmanship

What you get for the Standard Installation price

One Standard Installation price (€1,599) covers everything from the SEAI grant application through to post-install certification and aftercare. You deal with one team, and we guide you through the final SEAI declaration after installation.

SEAI grant — end to end

We submit your SEAI application, monitor the Letter of Offer, manage the 6-month deadline, and guide you through the final declaration after installation.

Safe Electric installation

A Safe Electric registered electrician installs your charger to current I.S. 10101 wiring rules, with appropriate protection, isolation, earthing, and bonding checks.

Up to code, every time

Photos help identify possible electrical upgrades. The installer checks earthing, required bonding, the fuseboard and supply on site. We explain and agree any additional work before it proceeds; defects affecting the charger must be resolved before connection.

Certification on completion

You receive Safe Electric completion certification after installation — required by SEAI, by your insurer, and good for resale.

Standard pricing covers everything

Charger, install, all materials, grant paperwork, and certification — €1,599 all-in. Net cost €1,299 after the €300 SEAI refund.

Aftercare + warranty cover

2-year workmanship warranty plus a 3- to 5-year manufacturer warranty, depending on the charger — and you only ever deal with one team.

Humm

Prefer to pay monthly?

Spread the cost of your installation with Humm finance, subject to approval.

See finance options

Finance is provided by Humm and is subject to approval. Terms, fees and credit checks apply.

What we check from your photos and video

Photos help us assess the work and confirm pricing. A Safe Electric registered installer confirms electrical suitability and carries out the required tests on site.

Open only hinged doors or flaps that are safe to access. Do not remove screws, protective covers or seals, or touch wiring. If access is unsafe, tell us and the installer will check.

01Fuseboard

Your fuseboard (consumer unit)

What we need

A straight-on photo of the whole front, with every breaker visible. Open only the hinged door or flap and leave protective covers in place.

Why this matters

The installer checks room, protection and capacity for an EV circuit. The examples show a modern candidate, a board needing review, and a legacy board that is not standard as shown.

Standard installation
A suitable board with room and capacity for the EV circuit, confirmed by the installer.
Needs assessment / possible extra work
Older protection, a full board, damage or missing covers may require additional work. We quote confirmed extras before you commit.
Photo or video guidance
Show the whole front straight on with labels readable. Open only the hinged door or flap; protective covers stay in place.
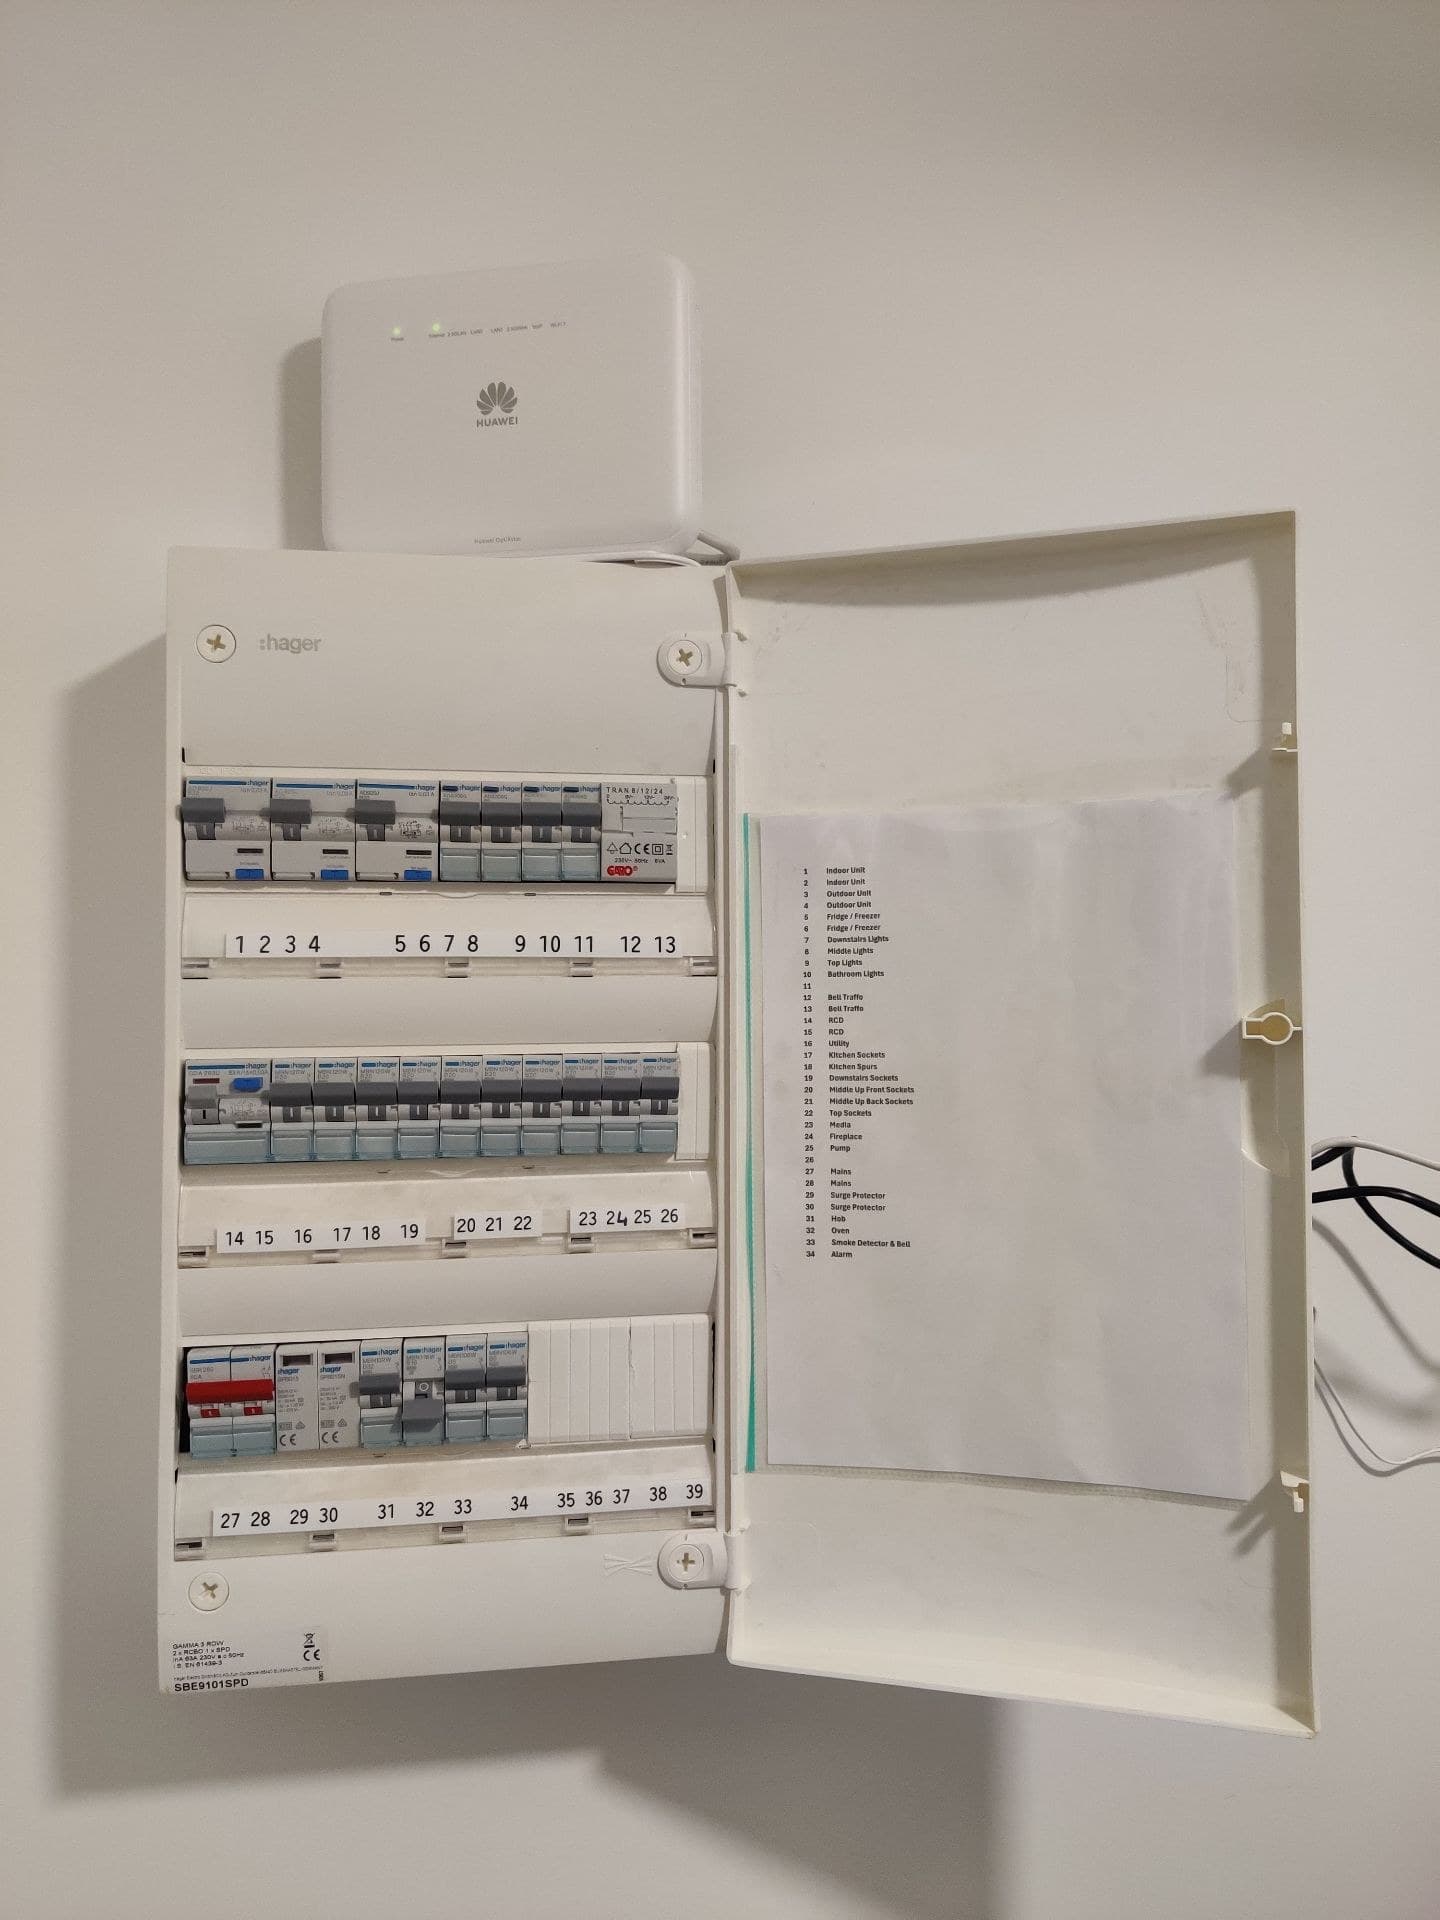
Modern Hager consumer unit with hinged door open, breakers and blanked spaces visible
Standard candidate
Modern layout with device fronts and spare spaces visible. The installer checks protection, capacity and suitability for the EV circuit.
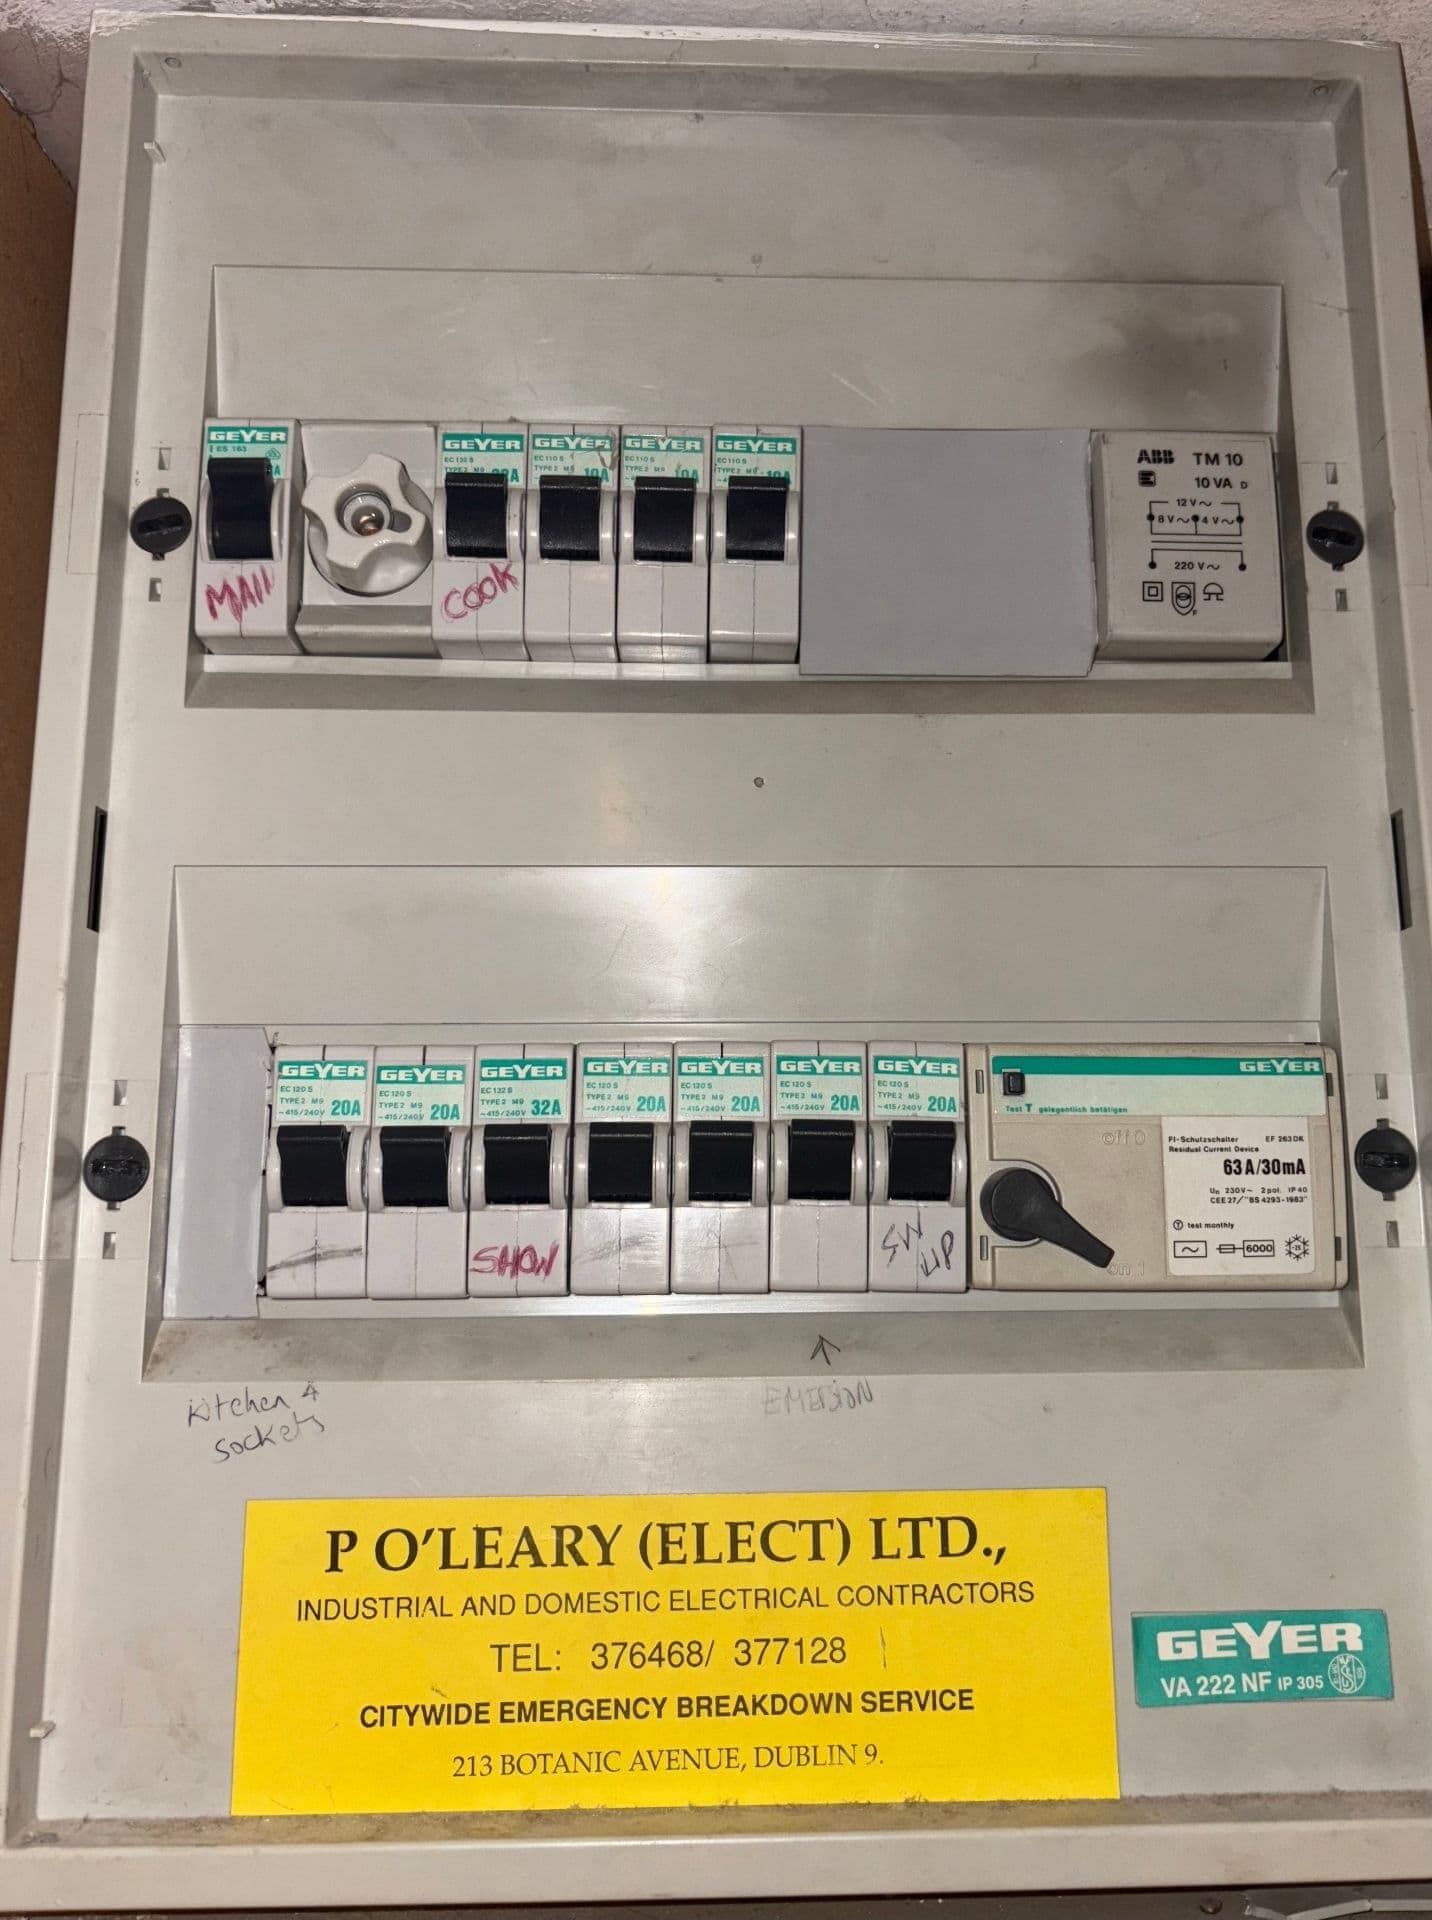
Older Geyer board with a mixture of breakers and fuse protection
Needs assessment
An older board needs assessment before we confirm the installation scope. Age alone does not decide whether it needs replacement.
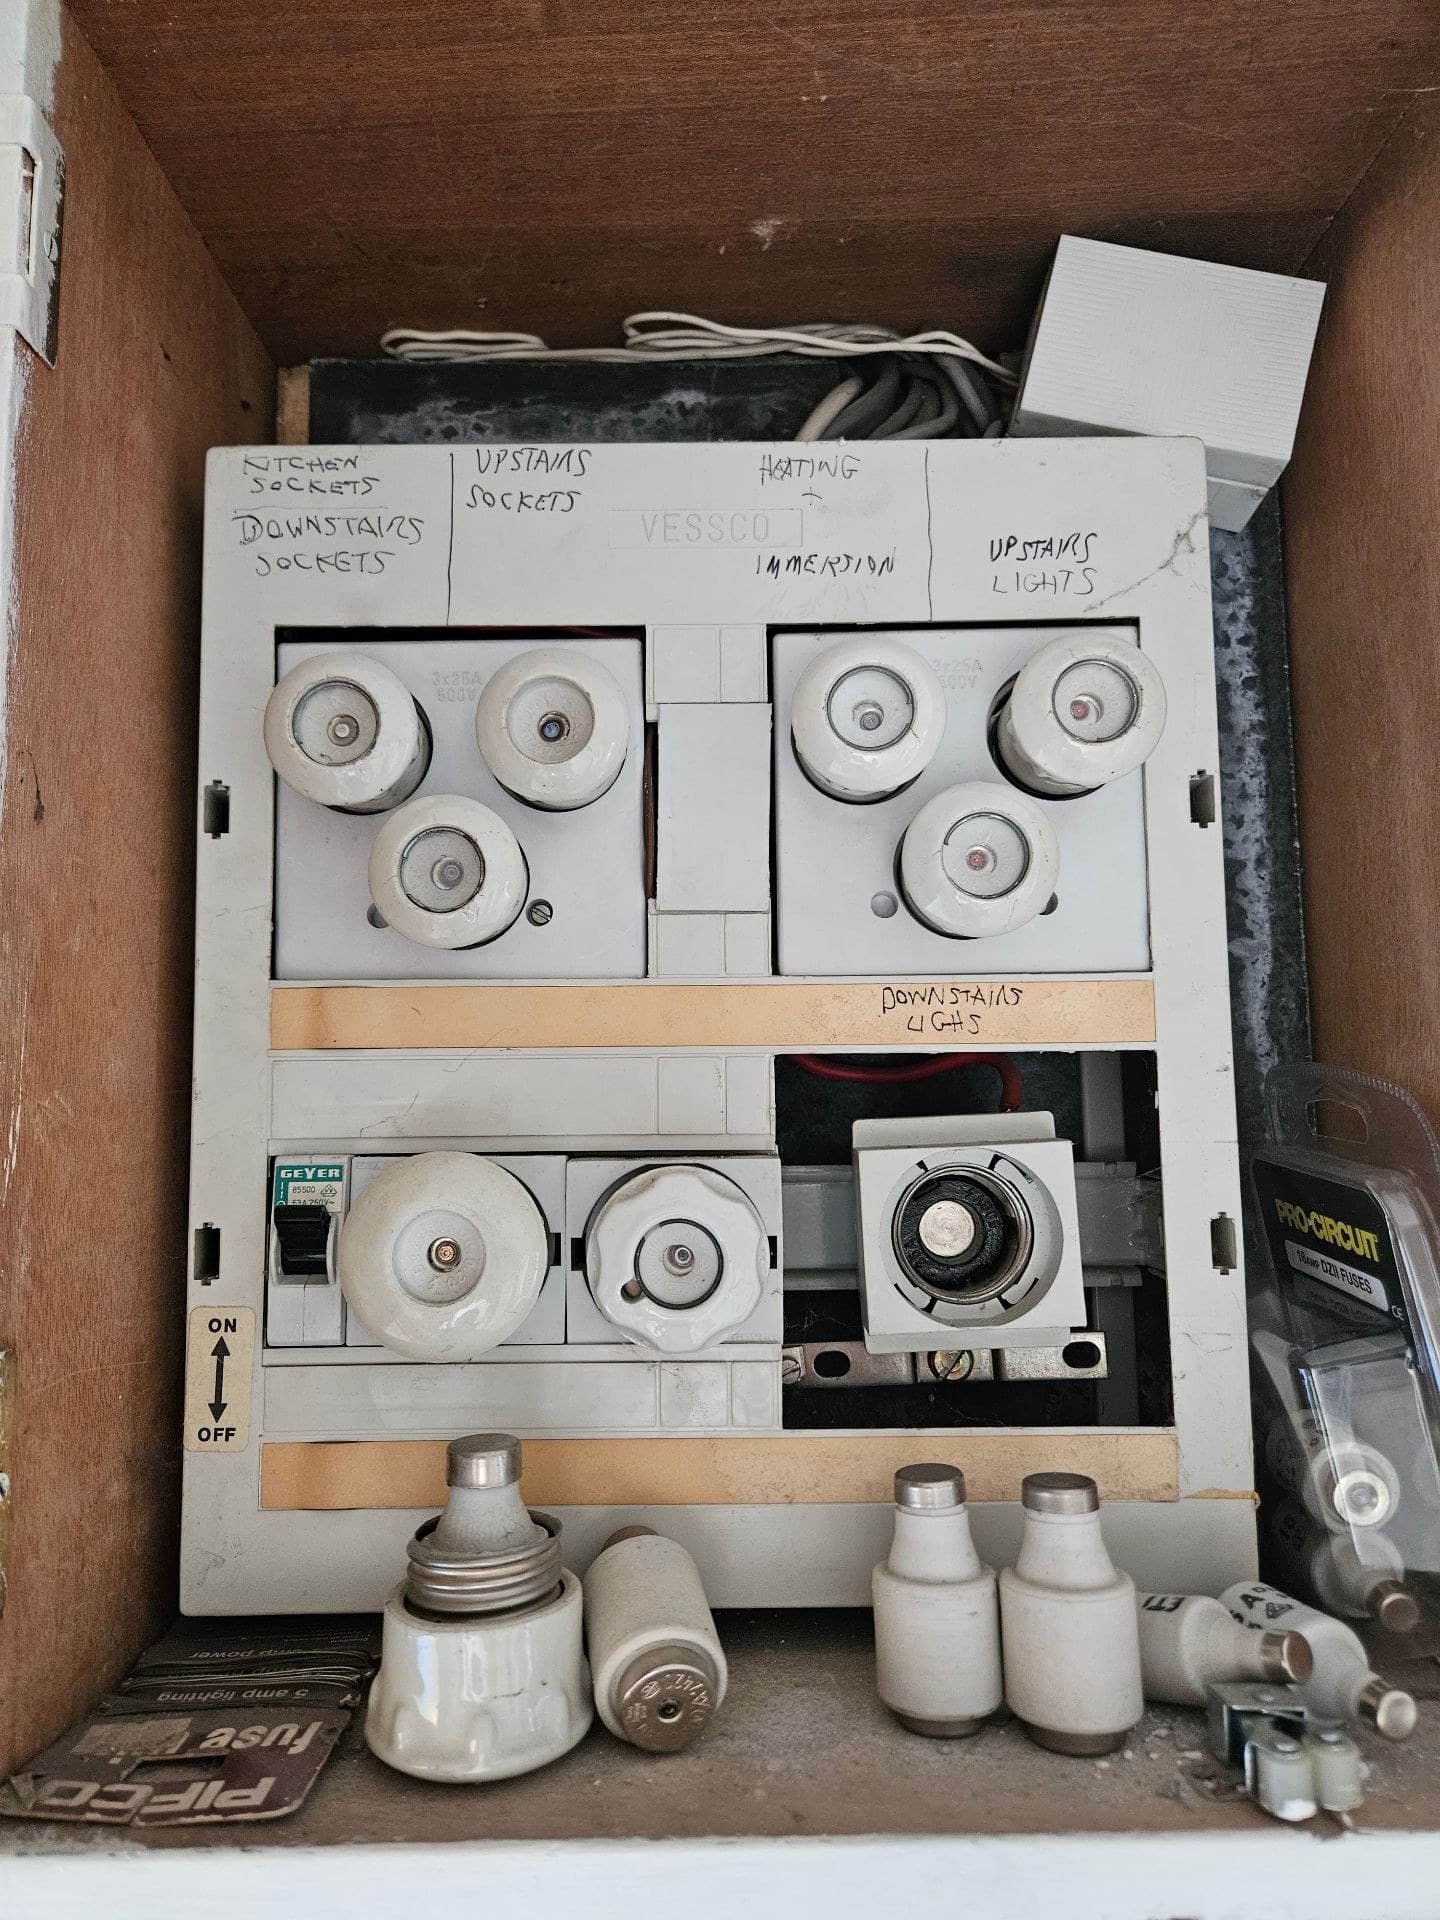
Legacy ceramic fuse board with missing front sections and visible internal wiring
Not standard as shown
Ceramic fuses and missing front sections need electrician assessment and any necessary remedial work before installation. Do not remove covers to copy this photo.

02Meter

Your meter and cut-out

What we need

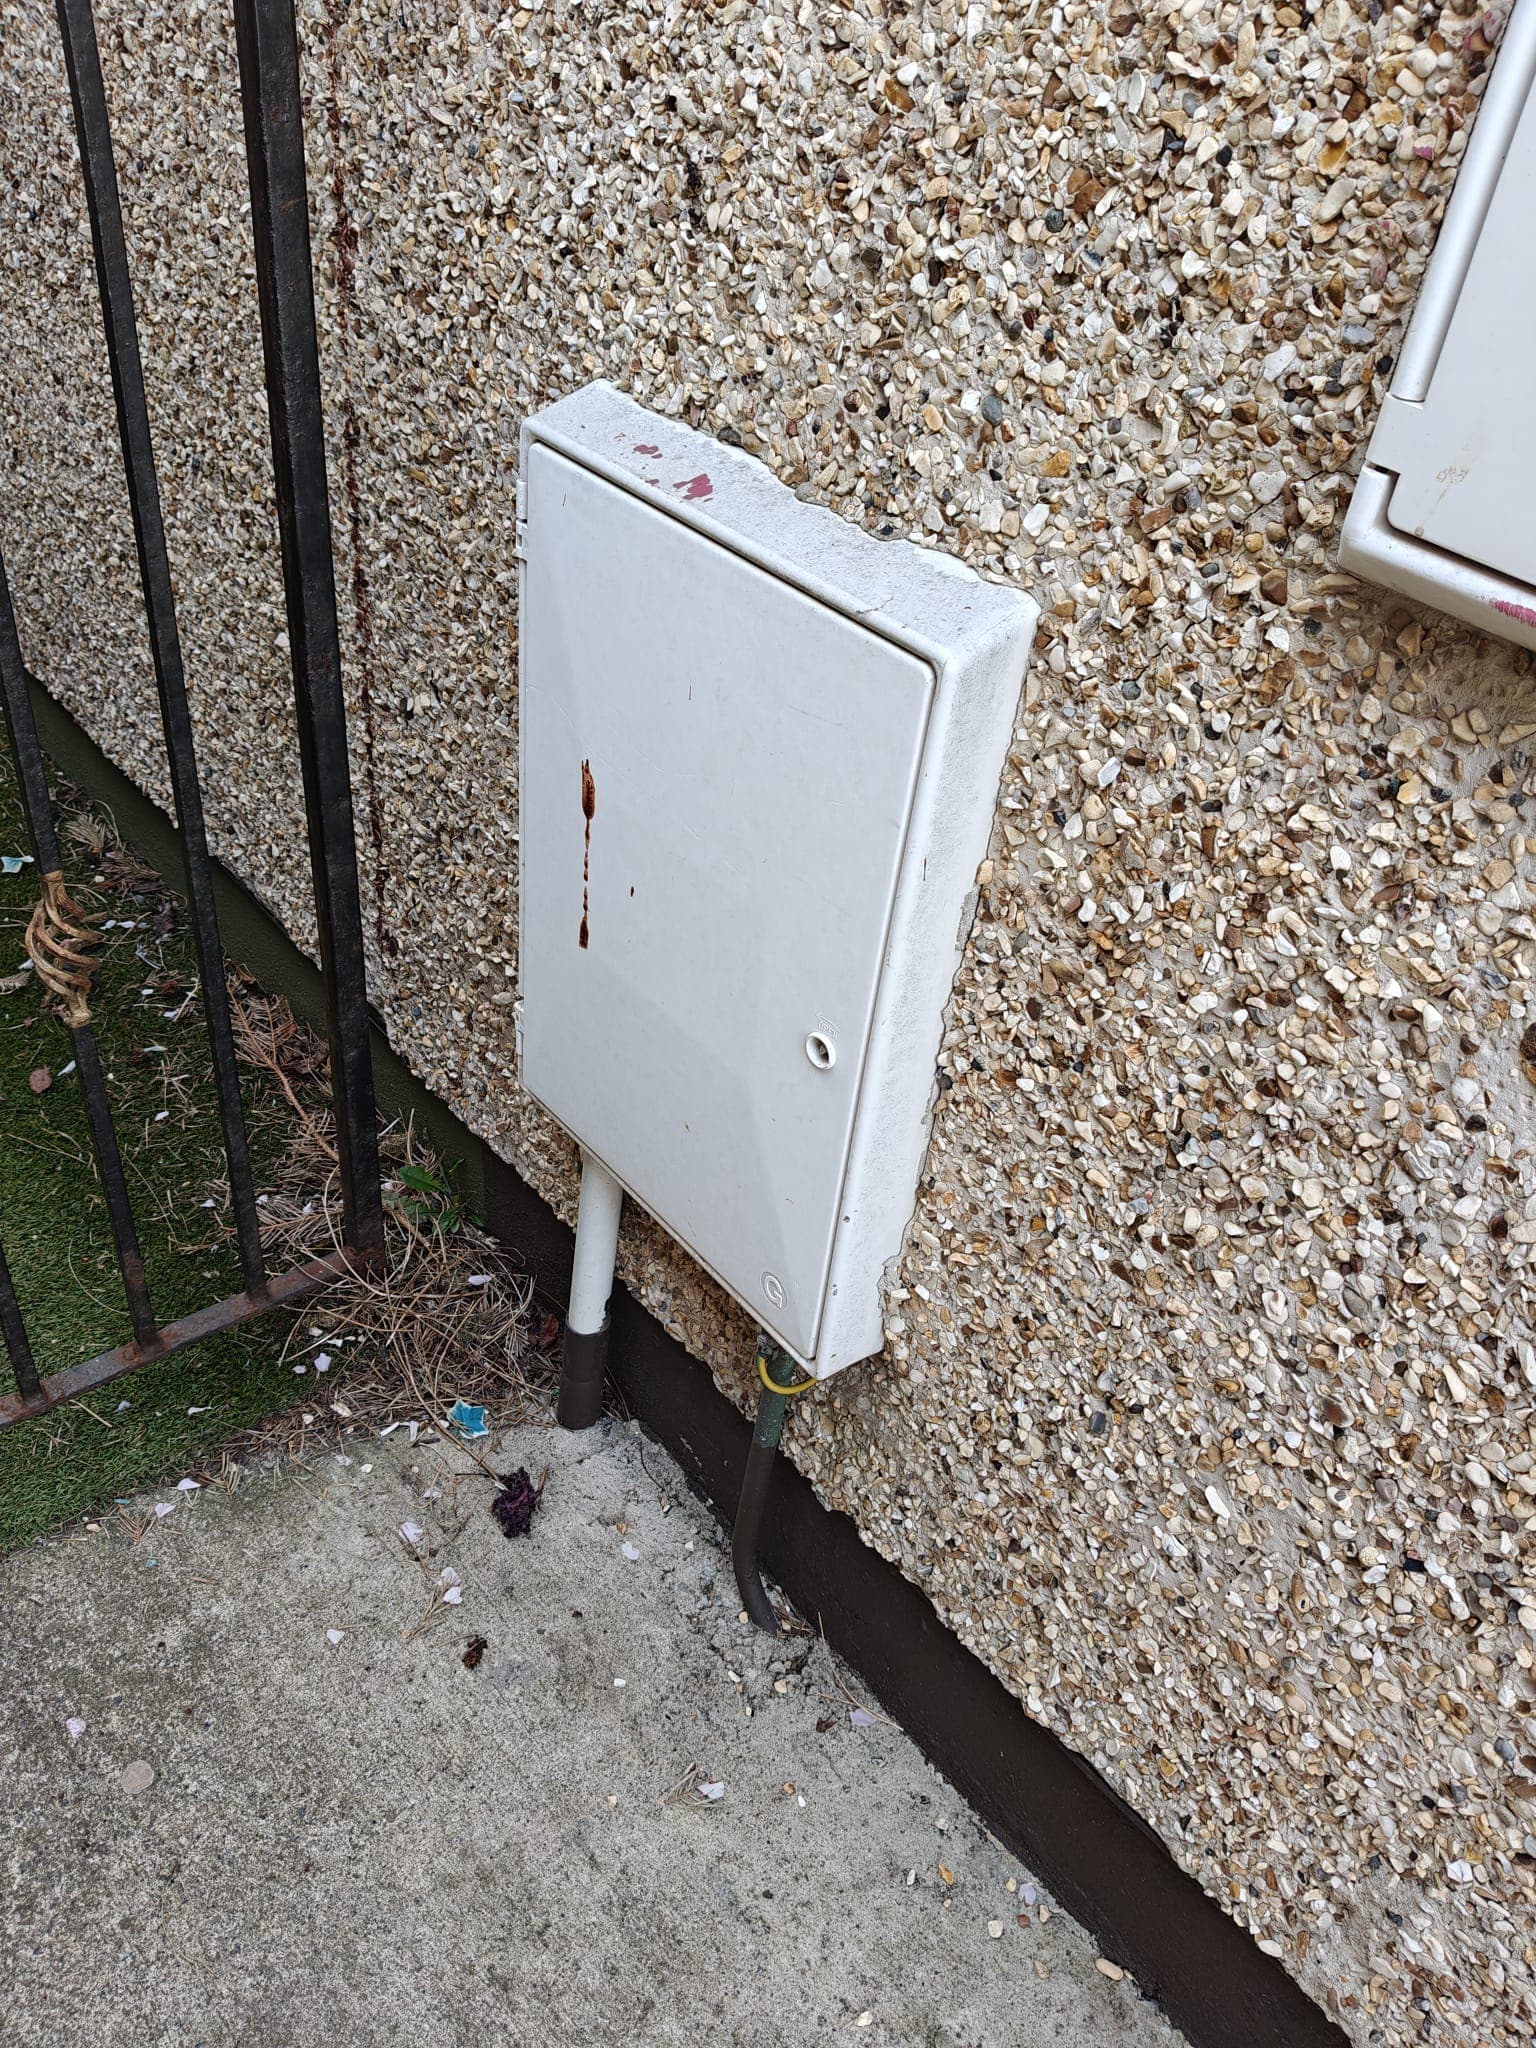
Show the whole electricity meter cabinet, main fuse/cut-out, any isolator and visible cables. Open only the cabinet door if safe to access.

Why this matters

The installer checks the supply and available capacity, with ESB Networks input where required. A modern smart meter does not by itself confirm a standard installation.

Standard installation
A suitable supply and connection route confirmed by the installer, with ESB Networks input where needed.
Needs assessment / possible extra work
An unfamiliar cut-out, indoor/prepay arrangement or suspected looped supply needs review before adding load.
Photo or video guidance
Show the whole cabinet. Leave sealed equipment and cables untouched. A cropped or closed-cabinet photo needs retaking.
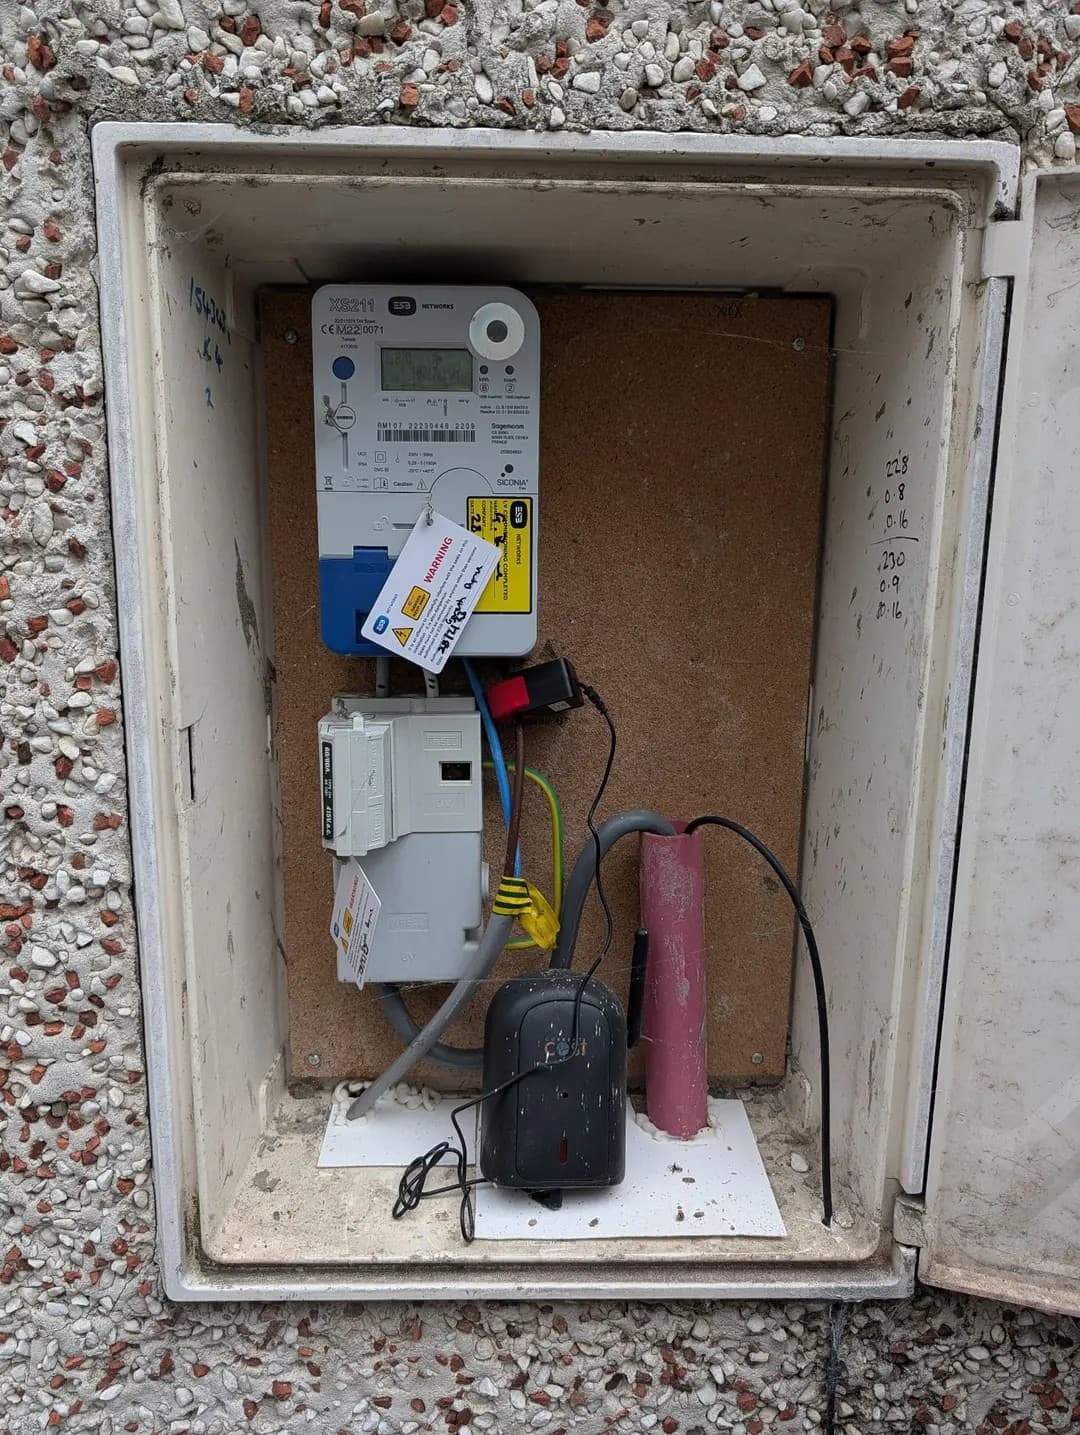
Open electricity meter cabinet showing the meter, cut-out and visible cables
Photo guide
Show the whole cabinet, meter, main fuse/cut-out, any isolator and visible cables. The installer checks supply capacity; a smart meter alone does not confirm it.
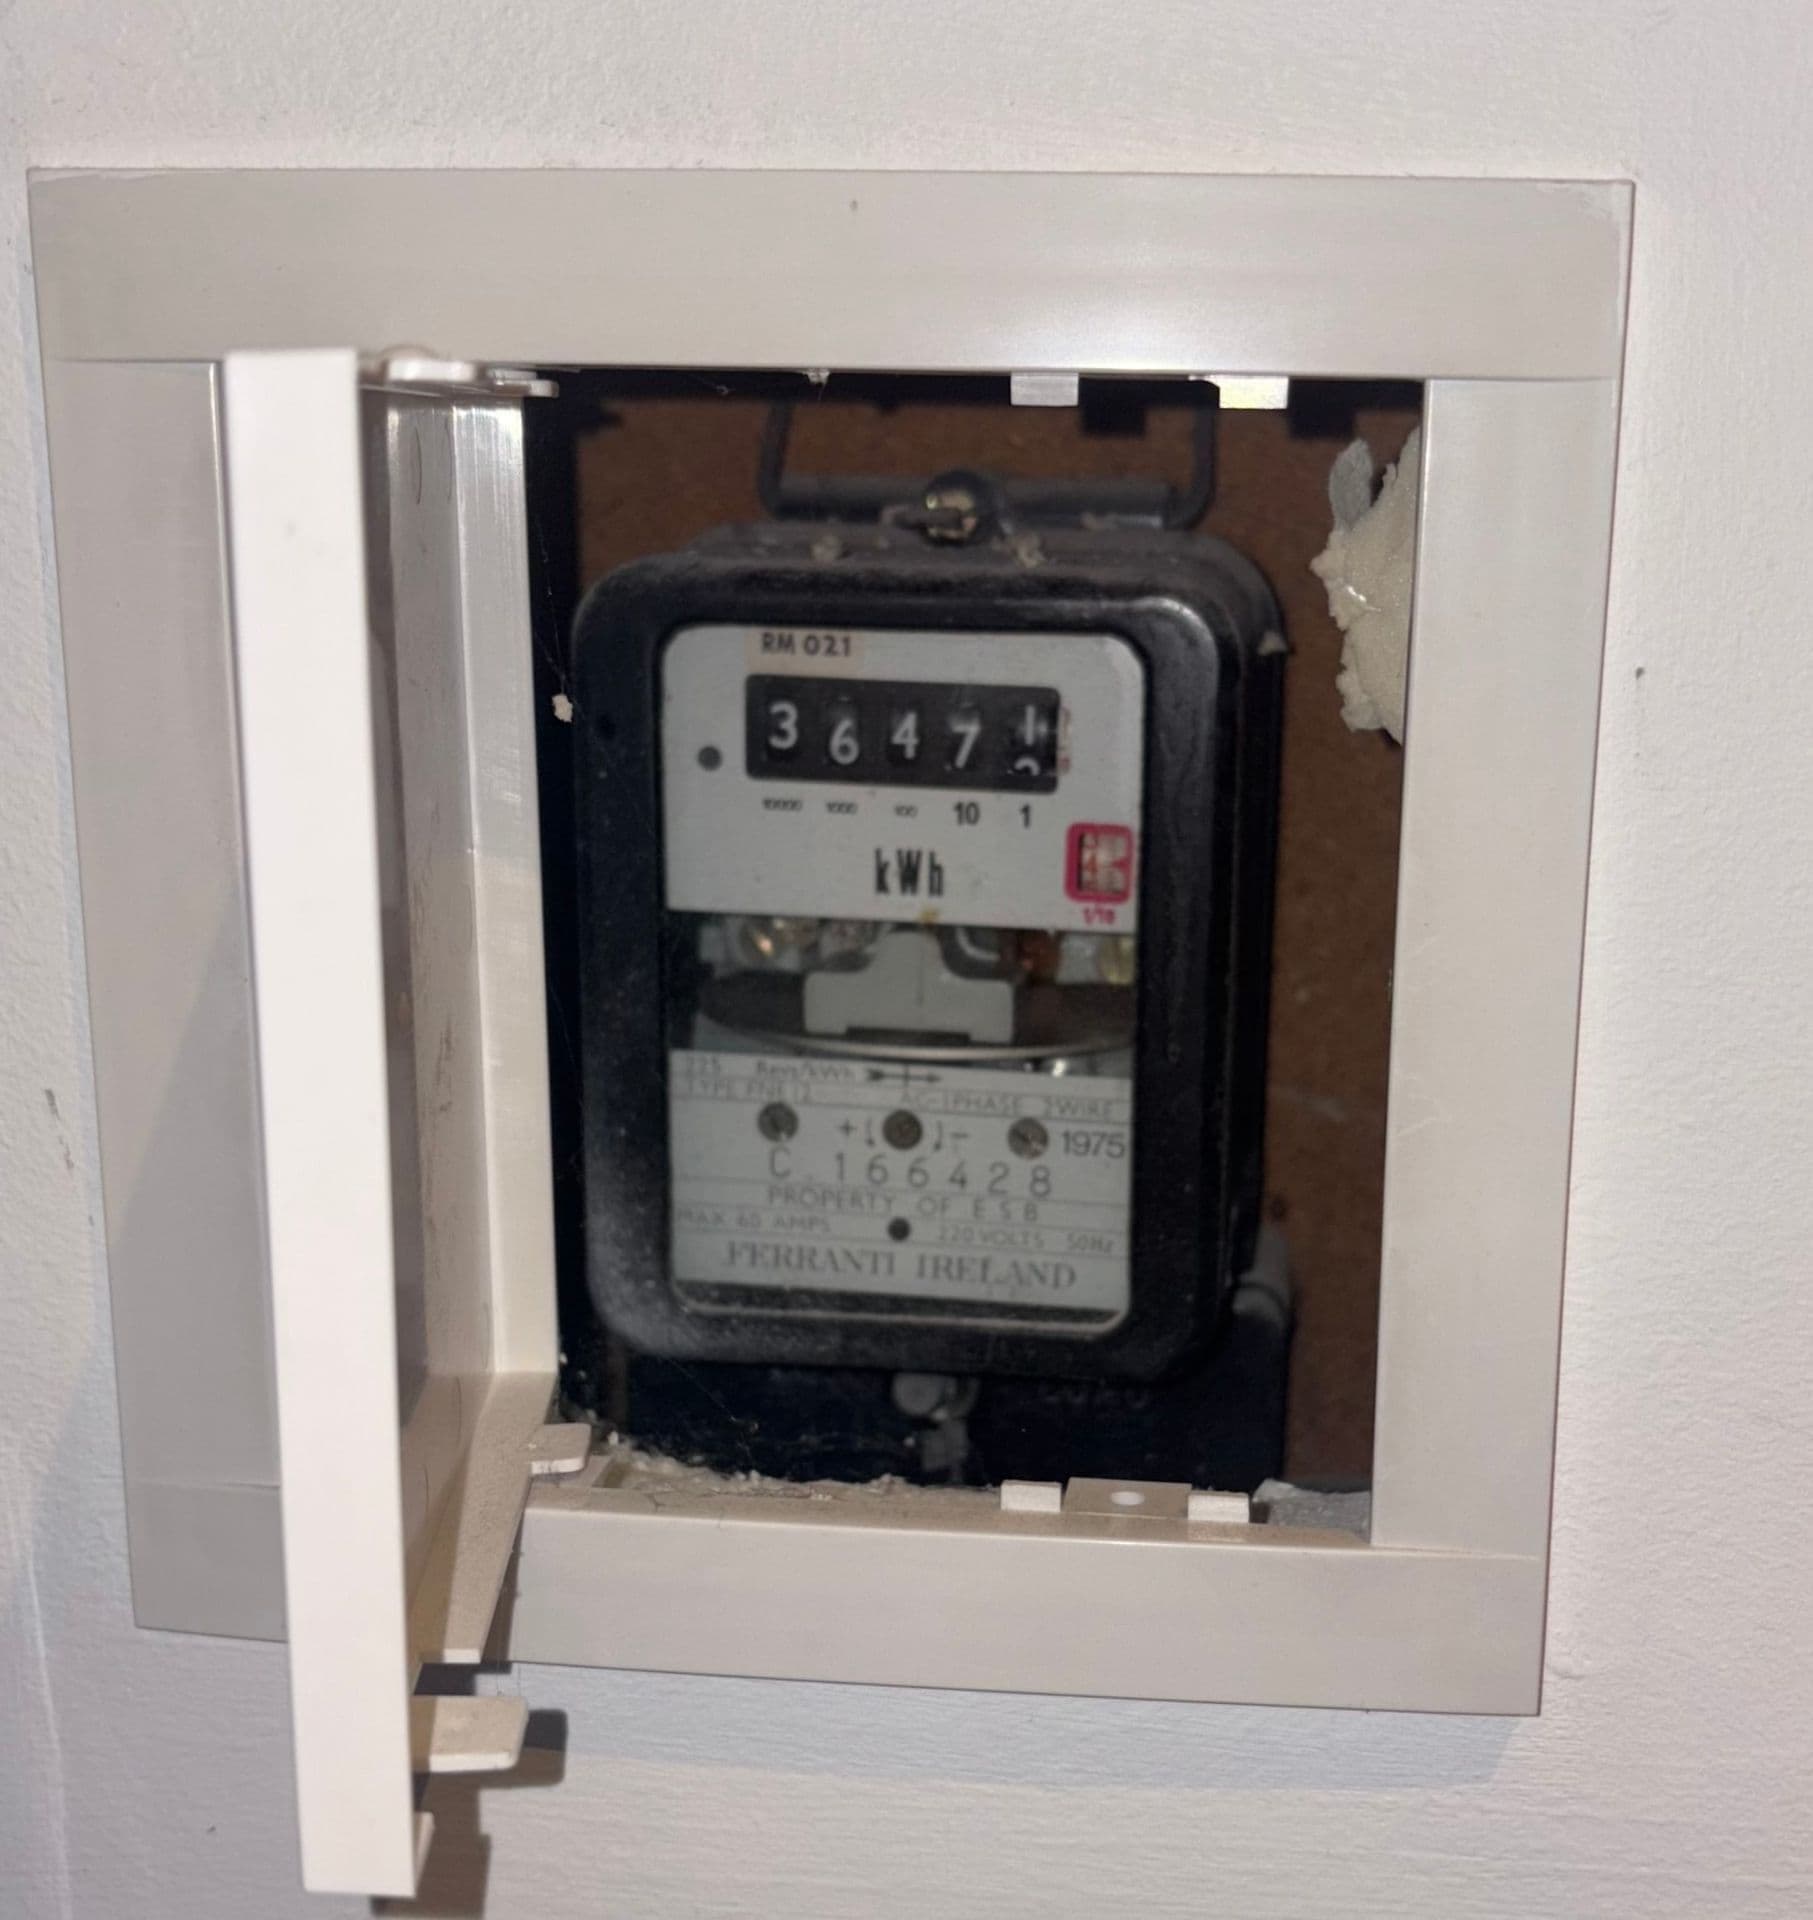
Older electricity meter recessed into an indoor wall
Needs assessment
Older or indoor arrangements need installer assessment. We contact ESB Networks if supply checks or changes are required.
Closed electricity meter cabinet hiding the equipment
Retake photo
The equipment is hidden. Open only the cabinet door, if safe to access, and take another photo. A closed door does not mean the installation is non-standard.

03Earthing

Earthing and protection

What we need

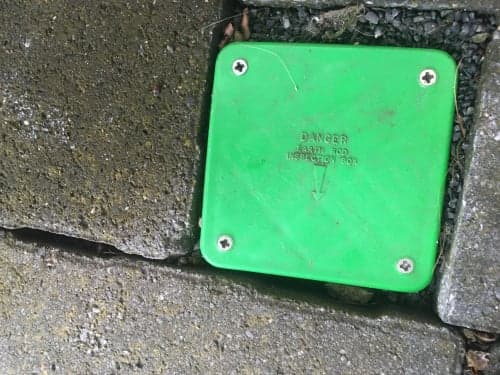
Photograph the earth-rod inspection lid and its location if one is present. If you cannot find it, tell us what you found.

Why this matters

The installer confirms the protection arrangement for the chosen charger. A visible lid is useful evidence, but does not prove that the earthing is satisfactory.

Standard installation
The installer confirms a satisfactory earthing and protection arrangement for the chosen charger.
Needs assessment / possible extra work
A missing or hidden inspection lid is not proof of a fault. Tell us what you found so the installer can confirm what is needed.
Photo or video guidance
Show the inspection point and its location if safely visible. Do not dig or remove covers for the photo.
Green earth-rod inspection lid set into concrete
Photo guide
Photograph the inspection lid if present. The lid identifies a location; it does not confirm the condition of the electrode or the earthing arrangement.
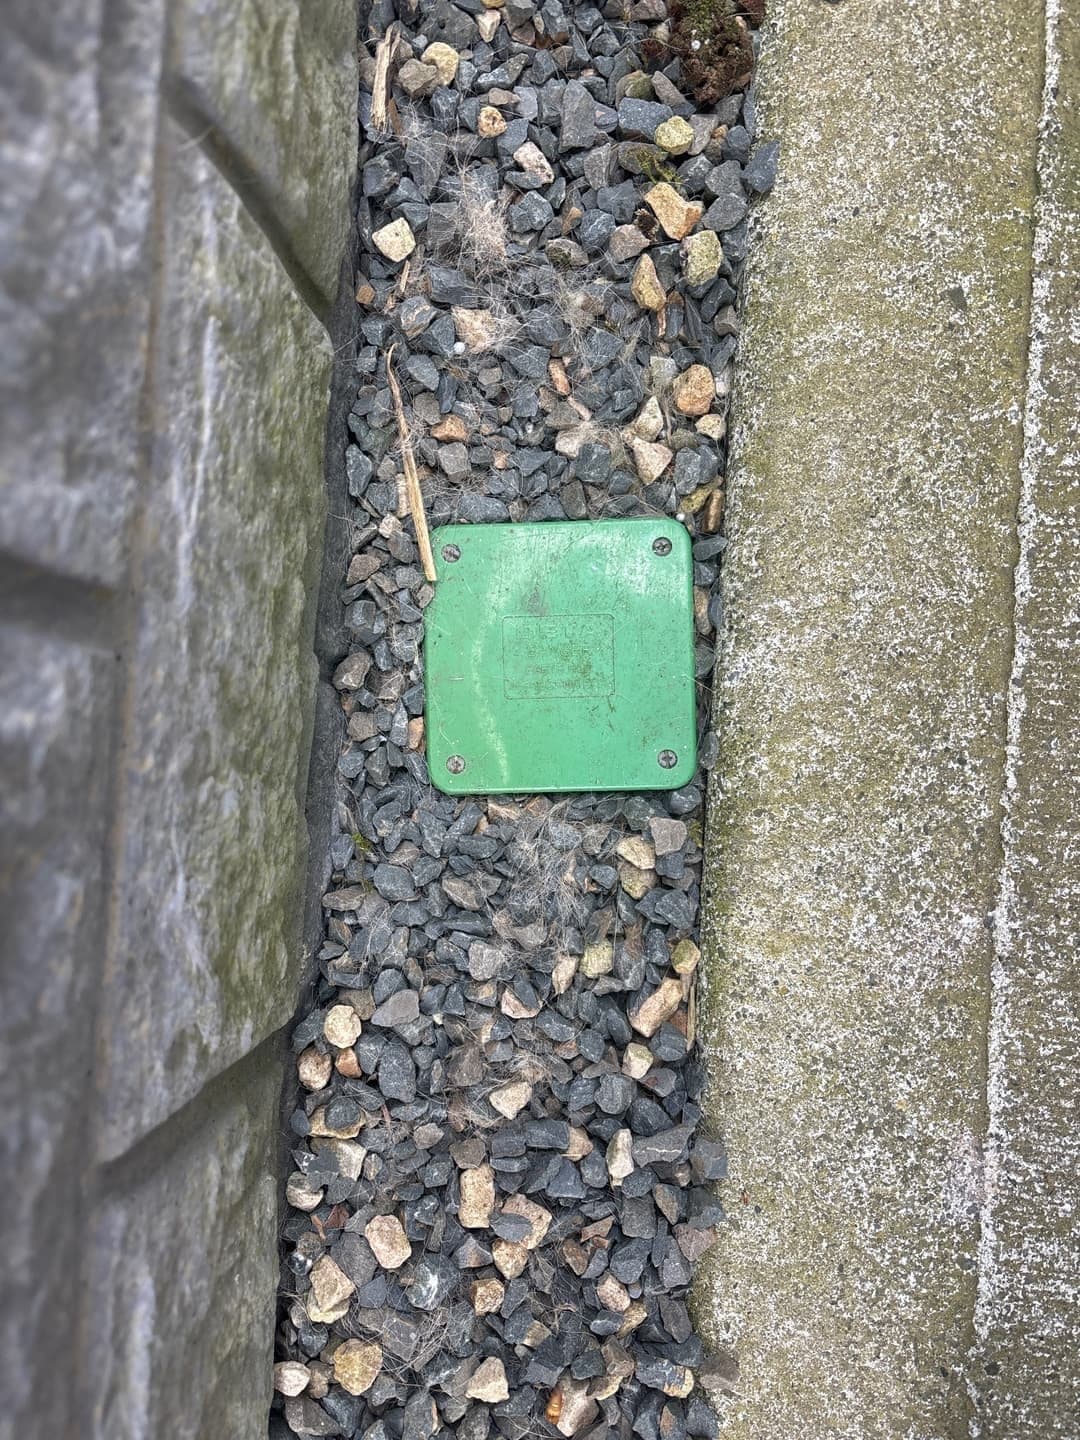
Green inspection lid in gravel beside a wall
Photo guide
The lid may be in gravel or paving. Do not dig or dismantle it. If you cannot find it, use the ‘not found’ option.

04Gas bonding

Gas service and bonding

What we need

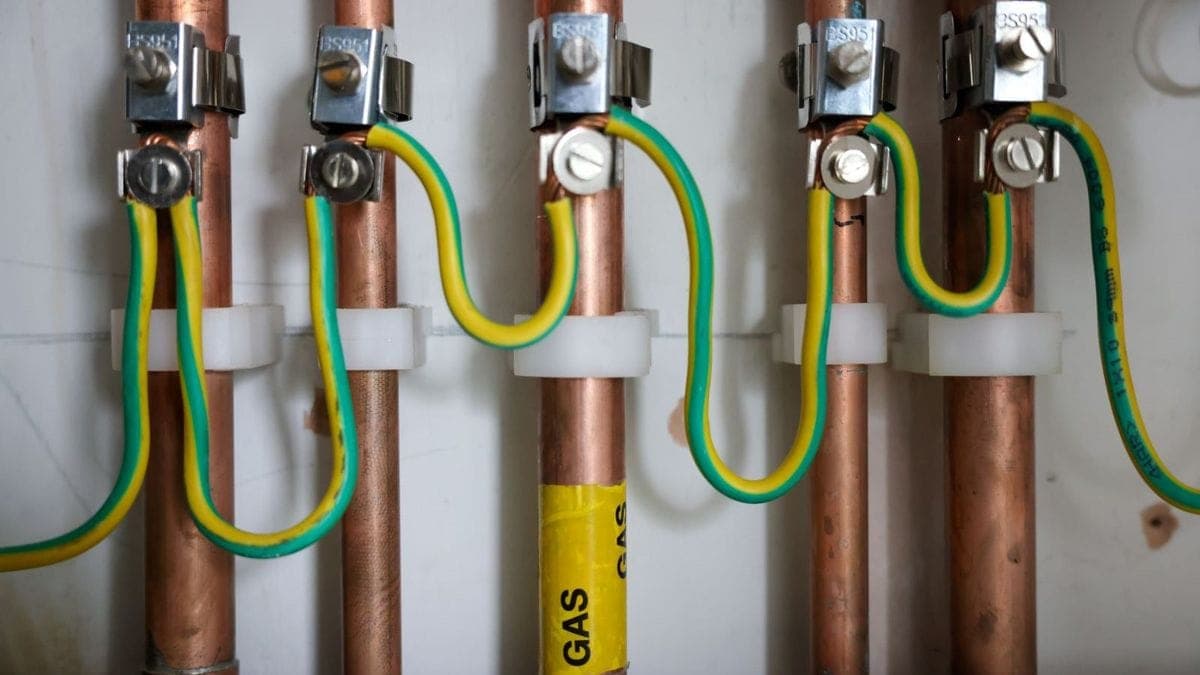
Show your gas service and any visible green/yellow cable and pipe clamp. Include enough context to show where the connection is. Tell us if there is no gas supply.

Why this matters

The installer checks any required main protective bonding. The detail below helps identify a clamp and cable; it does not certify the connection or its location.

Standard installation
Any required main protective bonding is present and satisfactory, as confirmed by the installer.
Needs assessment / possible extra work
If a connection is not visible, photograph the pipe anyway. The installer checks whether required bonding is missing or located elsewhere. Choose ‘No gas’ if applicable.
Photo or video guidance
Show the gas service with context, then any visible clamp and cable. A meter display alone is not enough.
Close-up of metal pipe clamps and green/yellow bonding cables, with one pipe labelled gas
Photo guide
This shows what a bonding clamp and green/yellow cable look like. Photograph your gas service and any visible connection. This detail is not a verified example of a complete installation.

05Water bonding

Water stopcock and bonding

What we need

Show the main stopcock or incoming water pipe and any visible bonding connection. If you cannot find or safely access it, tell us.

Why this matters

The installer determines whether the incoming service requires bonding and checks any required connection. A boiler manifold or sink waste pipe is not the main stopcock.

Standard installation
The installer confirms whether the incoming service needs bonding and checks any required connection.
Needs assessment / possible extra work
No cable visible, mixed/plastic pipework or an inaccessible stopcock needs assessment. Appearance alone does not establish a defect.
Photo or video guidance
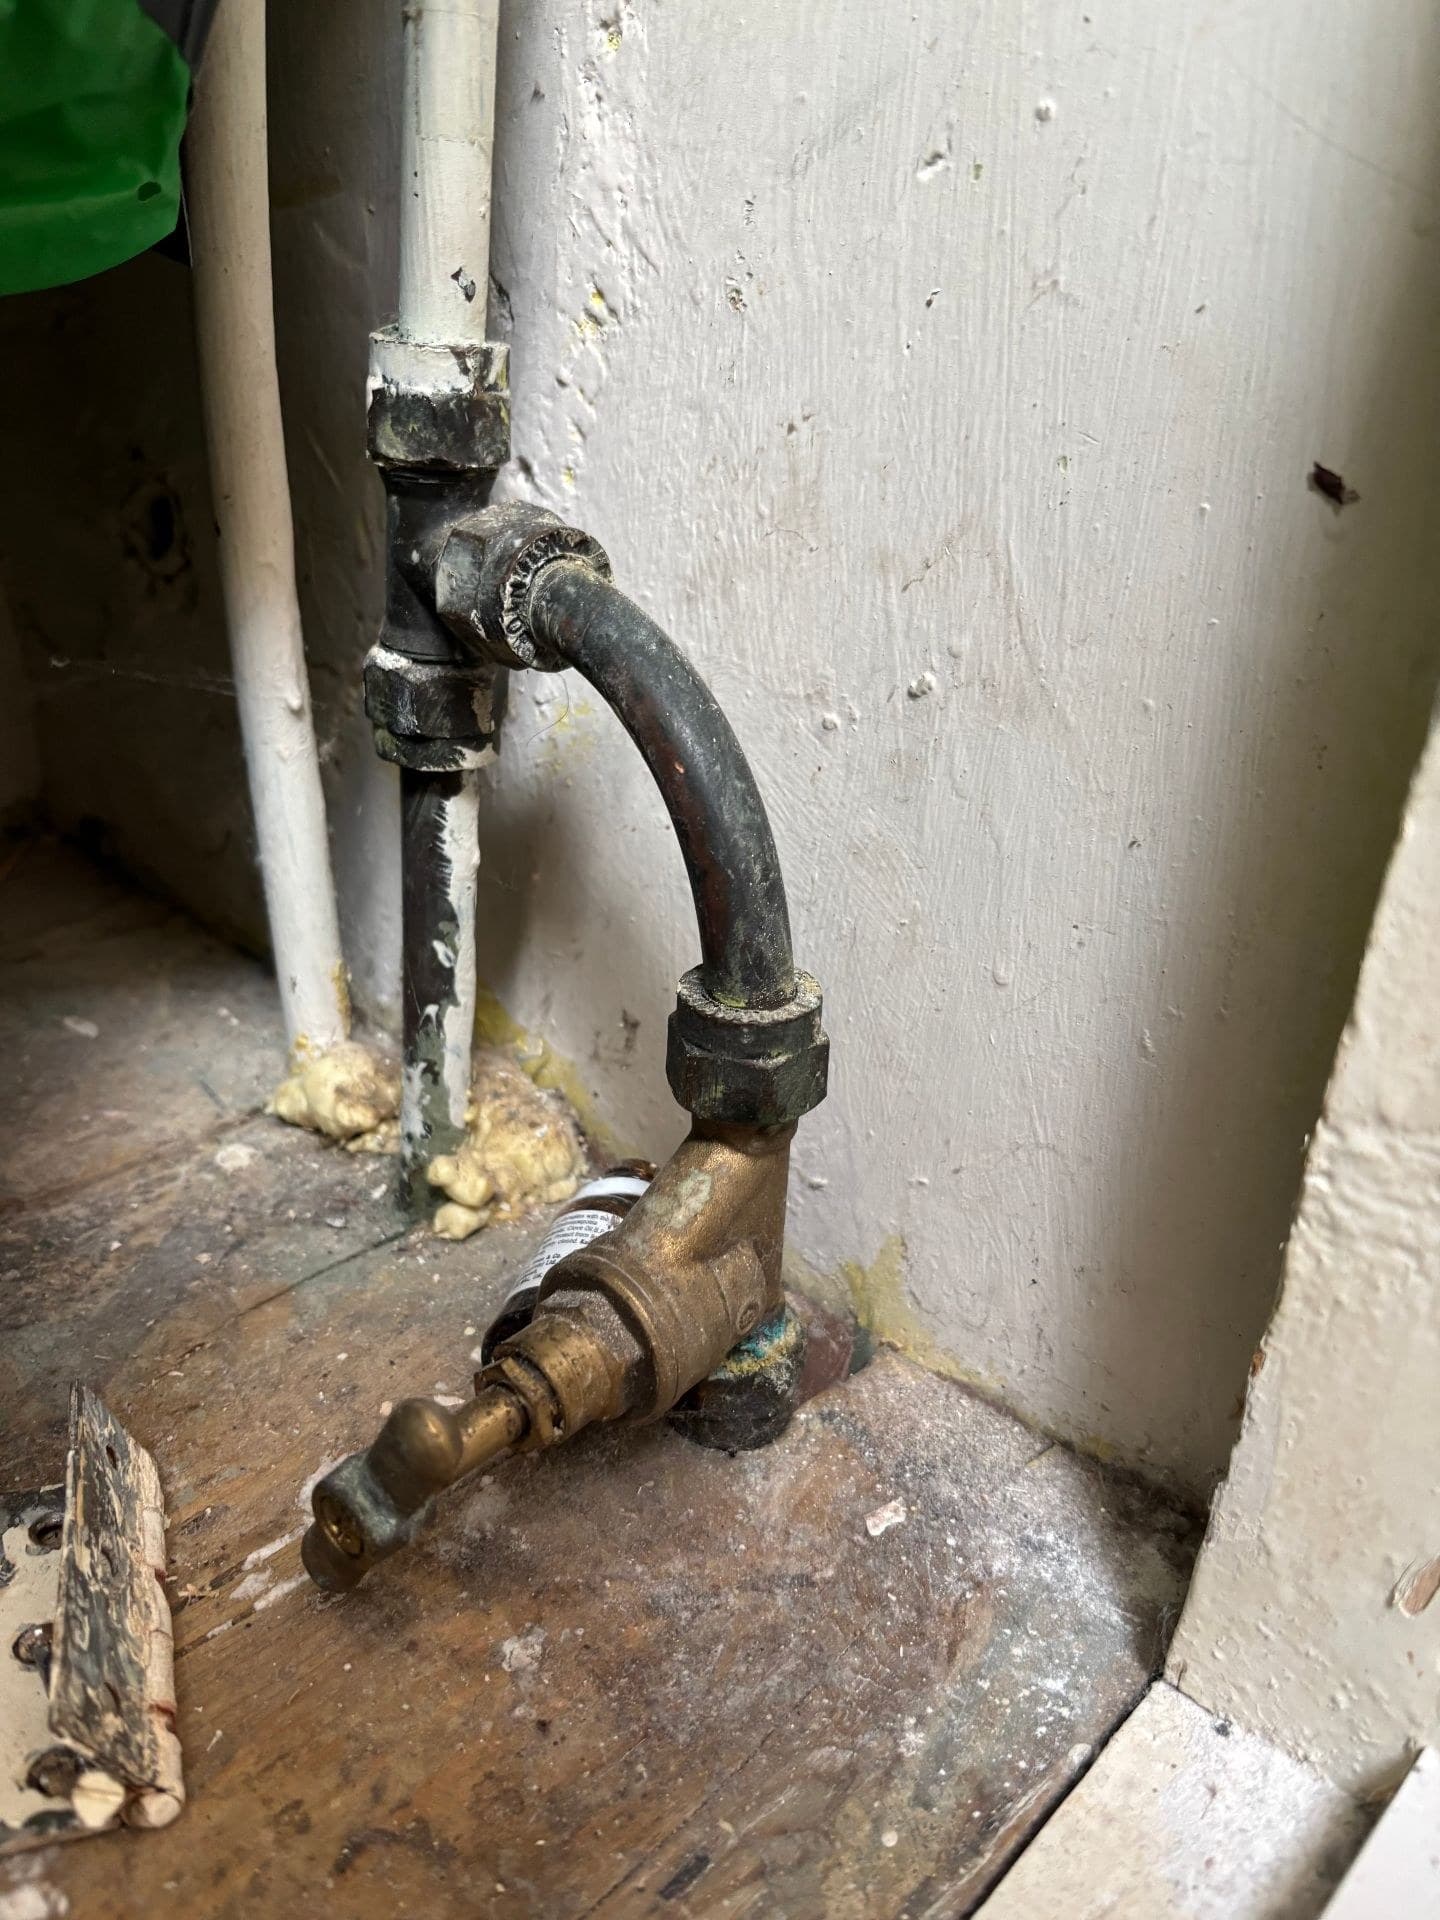
Photograph the main stopcock/incoming water pipe, not just a boiler, hot-water cylinder or sink waste pipe.
Water stopcock and incoming pipework with no bonding cable visible in the photograph
Needs assessment
Show the main stopcock and incoming pipe. No bonding cable is visible in this example; the installer must check whether bonding is required and where it connects.

06Parking

Parking and mounting point

What we need

Show the proposed charger position and the parking space together in your walkthrough video.

Why this matters

We check the installation location, access and any permissions or grant-route requirements before confirming the work.

Standard installation
A suitable mounting point and parking space associated with the home, confirmed during assessment.
Needs assessment / possible extra work
Shared parking, permissions, unclear boundaries or a special charging arrangement need a separate review.
Photo or video guidance
Include the proposed charger position and parking space together in the walkthrough.

Pan out so we can see the parking space and proposed mounting point together.

07Cable route

Cable route

What we need

Film a continuous walk along the likely route from the fuseboard or meter to the charger location.

Why this matters

The installer assesses the distance, surfaces and obstacles. Any work outside the agreed package scope is quoted before you commit.

Standard installation
A simple accessible cable route within the agreed installation scope.
Needs assessment / possible extra work
Long or obstructed routes, trenching and other civil work may need a separate quote.
Photo or video guidance
Film the route continuously so the installer can see its length, surfaces and obstacles.

Walk the route slowly and show obstacles or ground that may need digging.

08Household loads

Other household electrical loads

What we need

Tell us about heat pumps, electric showers, electric heating and other large loads. Include relevant equipment in the walkthrough where safe.

Why this matters

The installer must consider existing demand and any load-management requirements before adding a charger.

Standard installation
Existing household loads are included in the installer's capacity and load-management assessment.
Needs assessment / possible extra work
Tell us about heat pumps, electric showers, electric heating and other large loads. They are not an automatic rejection.
Photo or video guidance
Include relevant equipment in the walkthrough where safe. A fuseboard photo alone does not establish simultaneous demand.

09Bill

Electricity bill

What we need

Upload a clear photo or screenshot of your latest electricity bill showing the name, address and MPRN.

Why this matters

This confirms application and property details. It is not an electrical suitability check, and we do not use customer bills as public examples.

When we'll need an electrician to review first

ESB Networks, SEAI, and Safe Electric require us to confirm a few things before a charger goes in. If any of these apply, we'll send an electrician to take a closer look — and quote any extras transparently before you commit to anything.

  • Older or unclear fuseboard / meter setup

    Older equipment or an unclear protection or supply arrangement needs installer assessment. If only the photo is unclear, we ask for a retake first.

  • Indoor meter or prepay setup

    Indoor and prepay setups need installer review because the normal exterior route, supplier notification, and safe isolation position can differ. We need to look at these in person before quoting.

  • We can’t clearly see bonding or earthing

    The installer must confirm a satisfactory earthing/protection arrangement and any required gas/water bonding before certifying the charger circuit. If the earth rod is missing or hidden, or those pipe bonding cables are not visible, we send an electrician to confirm what is needed.

  • Looped or unfamiliar service

    Extra EV load must not be added to a looped service without first consulting ESB Networks. The installer checks unfamiliar cut-outs and contacts ESB where required.

  • Higher household electrical demand

    If you already have a heat pump, electric shower, immersion, or other large loads, the existing supply may need managed charging or an MIC upgrade. ESB Networks asks us to assess this before adding EV load.

  • Long or complex cable route

    A short, simple run between the board and the charger keeps your job inside Standard pricing. Longer routes, awkward attic runs, or anything that needs civils (cutting, ducting, trenching) is quoted separately.

The distance from your fuseboard to the charger affects the price.

A short, simple cable run is included in our €1,599 Standard Installation. Longer or more complex routes — across attics, through walls, or needing ducting/trenching — may need additional cabling and a separate quote. Capture your proposed route in the walkthrough video so we can confirm.

Electrical checks for every installation

Standard Installation describes the agreed work and price. Standard and non-standard jobs must meet the same electrical safety requirements. Photos help assess scope; the installer must inspect, test and certify the work. Any additional work is explained and agreed before it proceeds. A safety defect affecting the charger must be resolved before connection.

Gas and water bonding
The installer checks whether gas and water bonding is required and whether existing connections are satisfactory. Required bonding that is missing or inadequate must be corrected before the charger is connected and certified. Satisfactory existing bonding does not need replacing just because a charger is added. No gas service means no gas service to bond; plastic or mixed pipework still needs installer assessment.
Earth electrode
If you cannot find an earth rod or inspection chamber, select 'not found' and tell us. Do not dig or remove covers. A missing photograph does not prove an electrode is absent, and a visible lid does not prove it is satisfactory. The installer verifies the earthing arrangement and specifies any necessary work. A new build, TN-C-S supply or advertised PEN protection does not establish an exemption from these checks.
Meter tails
The installer checks the size, condition and capacity of the meter tails. SEAI's EV installation guidance requires tails below 16 mm² to be upgraded. Existing tails at or above 16 mm² still need to be suitable for the supply and added load; replacement is not automatic.

Sources: NSAI wiring rules, SEAI installation guidance, section 6.33, Safe Electric guidance on existing defects, and ESB Networks supply guidance.

What happens next

  1. 1

    You complete the online assessment

    Upload photos and a walkthrough covering your electrical setup, parking and cable route, plus your electricity bill. Takes 10–15 minutes.

  2. 2

    Our installer reviews your photos

    A Safe Electric registered installer assesses your evidence within 24 hours and either declares your installation Standard or flags it for a Pre-Approval visit.

  3. 3

    You book and pay (Standard) — or we send a surveyor (Pre-Approval)

    If Standard, you choose your installation date and pay your package price all-in (€1,599 with the standard charger). If Pre-Approval is needed, we arrange an electrician visit and quote any extras transparently before you commit.

  4. 4

    Professional installation, then your SEAI grant

    Our team installs your charger in 2–4 hours. We handle your SEAI paperwork; you receive €300 back from SEAI within 4–6 weeks. Net cost: €1,299.

Ready to confirm your Standard Installation?

Photos, a short walkthrough video, and we'll review everything within 24 hours. Most Irish homes qualify — and if yours needs a pre-approval visit, we'll tell you upfront.

Standard EV Charger Installation Ireland | From €1,299 After SEAI Grant | Volt Éire